New Feature in Basket – Conversation View for Orkut Scraps

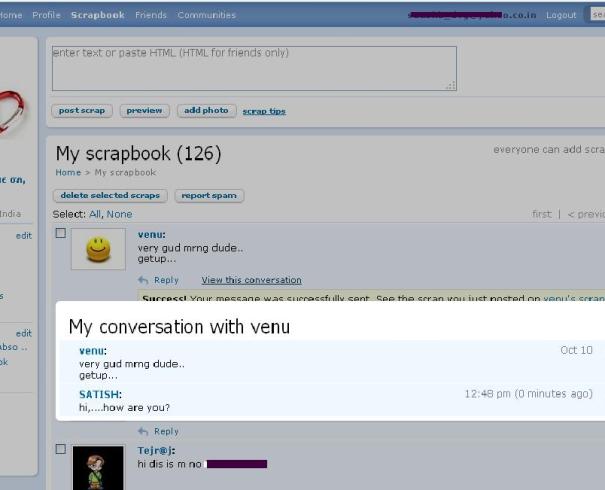
Orkut has been adding new feature these days and recently it has added yet another feature to its basket.That is, to view Conversation in a reverse Chronological Order, in a popup menu. We can even delete some scrap entries from the popup menu.

Orkut-Conversation-feature-new-release

Just click on the “view this conversation” link below any scrap that has been replied to, and you will see the back and forth scraping that you and your friends have shared. All replies are connected to the original scrap, so you can view them in sequence.

This feature is already rolled over to all Orkut accounts, but its not seen when you first log into your orkut account. If you want to see this feature, just reply to one of the scraps in your scrap book and you can see the “Conversation View” option in your scrap book as well.

Build Adword Ads in Minutes

Google has released the AdWords display ad builder, which lets you create professional-looking display ads in AdWords without needing to hire a professional designer or start from scratch.
professional_welcome_signup

And the best part of this tool is, it converts your ad to fit all possible placements across the Google content network, including video and game placements.

To start creating your ads, click Display Ad Builder on the Create an ad page within a new or existing campaign in your AdWords account.

And the sad part asusual is, this feature is presently only available to all advertisers in the U.S. and Canada.

Hope Google rolls this feature to all its adword customers soon. Meanwhile watch this short video tutorial demonstrating how to create your first ad:


If you are new to AdWords and want to learn more about creating and running display ads, visit the new Display Ads 101 tutorial.

And watch above video even if the feature is not yet available to you, because we think that this feature will soon be available to everyone of us, as Adwords is bread and butter to Google, and I am sure Google won’t delay with releasing any feature to its adword customers.

With this improvements in Adwords, we are expecting more creative and interactive advertisements on blogs running Adsense ads.

And there is another thing to observe in the above video. Google is using its own browser while creating such video demos and tutorial, which will also motivate others to use it. So we need to be an idol for others when it comes to using our products efficiently.

Faster Access of Gmail Using keyboard Shortcuts

We had seen about Gmail keyboard shortcuts in Google Official Blog some times ago, and wanted to write about it after testing whether its worth using or not.

So we started using it from the day we saw it. At first it was just fun..after some time we thought that its a good exercises to our brain, and after using it extensively we feel that, this feature of Gmail is so awesome that, everyone must try using it as far as possible.

Some simple reasons to start using Gmail Keyboard shortcuts:

1. It saves lot of time.

2. People think you as a geek, when they see you using Gmail without touching mouse 🙂

3. And we have observed that, when we use the keyboard shortcut, it works faster when compared to that when we use mouse, to perform the same task.

4. Practicing these shortcuts will help you a lot, if you have purchased a laptop recently and you don’t have a mouse attached to it. Touchpad is quite irritating, until we get used to it.

Keyboard shortcuts

Keyboard shortcuts help you save time by allowing you to never take your hands off the keyboard to use the mouse. You’ll need a Standard 101/102-Key or Natural PS/2 Keyboard to use the shortcuts. To turn these case-sensitive shortcuts on or off, click Settings,and see for “Keyboard shortcuts” in the General tab and select Keyboard shortcuts on, and click on Save Changes button.
enable-gmail-keyboard-shortcut
Here are the list of Default Gmail shortcut keys(which can also be found in your Settings –> Keyboard Shortcuts tab, of your Gmail account).

Shortcut Key Definition Action
c Compose Allows you to compose a new message. <Shift> + c allows you to compose a message in a new window.
/ Search Puts your cursor in the search box.
k Move to newer conversation Opens or moves your cursor to a more recent conversation. You can hit <Enter> to expand a conversation.
j Move to older conversation Opens or moves your cursor to the next oldest conversation. You can hit <Enter> to expand a conversation.
n Next message Moves your cursor to the next message. You can hit <Enter> to expand or collapse a message. (Only applicable in ‘Conversation View.’)
p Previous message Moves your cursor to the previous message. You can hit <Enter> to expand or collapse a message. (Only applicable in ‘Conversation View.’)
o or <Enter> Open Opens your conversation. Also expands or collapses a message if you are in ‘Conversation View.’
u Return to conversation list Refreshes your page and returns you to the inbox, or list of conversations.
e Archive Archive your conversation from any view.
m Mute Archives the conversation, and all future messages skip the Inbox unless sent or cc’d directly to you. Learn more.
x Select conversation Automatically checks and selects a conversation so that you can archive, apply a label, or choose an action from the drop-down menu to apply to that conversation.
s Star a message or conversation Adds or removes a star to a message or conversation. Stars allow you to give a message or conversation a special status.
! Report spam Marks a message as spam and removes it from your conversation list.
r Reply Replies to the message sender. <Shift> + r allows you to reply to a message in a new window. (Only applicable in ‘Conversation View.’)
a Reply all Replies to all message recipients. <Shift> +a allows you to reply to all message recipients in a new window. (Only applicable in ‘Conversation View.’)
f Forward Forwards a message. <Shift> + f allows you to forward a message in a new window. (Only applicable in ‘Conversation View.’)
<Esc> Escape from input field Removes the cursor from your current input field.
<Ctrl> + s Save draft Saves the current text as a draft when composing a message. Hold the <Ctrl> key while pressing s and make sure your cursor is in one of the text fields — either the composition pane, or any of the To, CC, BCC, or Subject fields — when using this shortcut.
# Delete Moves the conversation to Trash.
<Shift> + i Mark as read Marks your message as ‘read’ and skip to the next message.
<Shift> + u Mark as unread Marks your message as ‘unread’ so you can go back to it later.
[ Archive and previous Archives your conversation and moves to the previous one.
] Archive and next Archives your conversation and moves to the next one.
z Undo Undoes your previous action, if possible (works for actions with an ‘undo’ link).
<Shift> + n Update current conversation Updates your current conversation when there are new messages.
q Move cursor to chat search Moves your cursor directly to the chat search box.
y Remove from Current View*
Automatically removes the message or conversation from your current view.

  • From ‘Inbox,’ ‘y’ means Archive
  • From ‘Starred,’ ‘y’ means Unstar
  • From ‘Trash,’ ‘y’ means Move to inbox
  • From any label, ‘y’ means Remove the label

* ‘y’ has no effect if you’re in ‘Spam,’ ‘Sent,’ or ‘All Mail.’

. Show more actions Displays the ‘More Actions’ drop-down menu.
? Show keyboard shortcuts help Displays the keyboard shortcuts help menu within any page you’re on.

Combo-keys – Use the following combination’s of keys to navigate through Gmail.

Shortcut Key Definition Action
<tab> then <Enter> Send message After composing your message, use this combination to send it automatically. (Supported in Internet Explorer and Firefox, on Windows.)
y then o Archive and next Archives your conversation and moves to the next one.
g then a Go to ‘All Mail’ Takes you to ‘All Mail,’ the storage site for all mail you’ve ever sent or received (and have not deleted).
g then s Go to ‘Starred’ Takes you to all conversations you have starred.
g then c Go to ‘Contacts’ Takes you to your Contacts list.
g then d Go to ‘Drafts’ Takes you to all drafts you have saved.
g then i Go to ‘Inbox’ Returns you to the inbox.
g then t Go to ‘Sent Mail’ Takes you to all mail you’ve sent.
* then a Select all Selects all mail.
* then n Select none Deselects all mail.
* then r Select read Selects all mail you’ve read.
* then u Select unread Selects all unread mail.
* then s Select starred Selects all starred mail.
* then t Select unstarred Selects all unstarred mail.

All these above keyboard shortcuts can be changed by changing the settings in your Gmail account(by going to Settings and Keyboard Shortcuts tab ).

Another small useful feature: If you often send messages, where the subject is the entire message (e.g. “Going to movie at 2:15?”), and Gmail would always prompt you to add in body text. Now, however, you can add “EOM” or “(EOM)” at the end of the subject line (short for End Of Message), and Gmail will silently send the message without the unnecessary prompt.

Google team know that these keyboard shortcuts are difficult to remember, so they have added another small feature, i.e., shortcut reference menu.
Gmail-shortcut-help-menu

You can call up this menu by holding “shift” and hitting the “?” (without cotes ofcourse) key while logged in. It’s easy to remember: just type “?” any time you have a question about a shortcut and need a reminder. This feature works in the latest version of Gmail, currently available for English IE7 and Firefox 2 users. And not a great surprise, these shortcuts also work in Google Browser Chrome.

Google Docs improved: Now with instant templates

Google Docs was/is of great help from the day it launched, but today we have a speacial reason to thank Google Docs Team. That is, they have launced a  new template gallery for documents, spreadsheets, and presentations. Now, whether you need business cards, letterhead, or employee time sheets, you don’t have to start from a blank slate. Find the template that’s right for you and start customizing it with your information – you’ll save time on formatting and formulas.

To access the template gallery:

1. Log in to your Google Apps account at http://docs.google.com/a/example.com (Be sure to replace ‘example.com’ with your actual domain name.)
2. Click ‘New’
3. Select ‘From template…’

or click here and login with your Google account.


Many templates leverage the collaborative aspect of Google Docs so that several people can work on a single document online without having to email attachments back and forth. To hear the story behind two templates, watch these videos:


Traffic Strategies PART 3: Submit your blog to these websites

Today’s article is full of information’s that we have experienced with our blog.

1) BurstBlog of Pluck is an opt-in aggregation and syndication service that brings high-quality, topical blogs together with high-traffic web sites. With BlogBurst, bloggers gain visibility, audience reach and traffic through placement on major online publishers and media destinations in real time.

* BlogBurst will promote your blog in their publisher workbench
* BlogBurst top-tier publishers display your blog content on their sites
* Clicks on your byline drive new traffic to your blog

Most famous publishers of BlogBurst, who publish the BlogBurst content are:-


More publisher blogs will be added in coming days(as blogburst promises). Technotip.org was also featured on some of these great websites, here are some of the links from which we got lot of traffic Know This Before Using Google Custom Search Engine, How to get Good Night Sleep?. After reading this, the first question you may ask is, isn’t that publishing duplicate content(against Google) ? At first sight, it seems to be yes. But in reality, see the number of followers of those famous websites. They are already famous companies and many people follow them religiously. Being featured on such websites will bring in greater exposure of our blog and more traffic and reputation. Just request for an invitation here.

Technical Criteria

At this time BlogBurst requires that you provide a syndication feed in a standard XML format (RSS, Atom, etc). Most popular blogging platforms (TypePad, Blogger, Easyjournal, MovableType, WordPress, LiveJournal etc.) and FeedBurner provide compatible feeds that will work seamlessly with the system. Feeds should be full text posts and should not contain advertising, sponsorships or other commercial information.

And if you have Adsense for Feed activated on your feed, then just don’t worry. Consider setting up a second feed on Feedburner with full feed of your blog, but do not advertise that feed on your blog site. Then submit that feed to BlogBurst. Note that Blogburst do not publish the URL for the feed you submit to them. Once you are accepted into BlogBurst, you will get an account where you can see who has published your contents and how much traffic you are getting from them etc. And the best thing about BlogBurst network is:- You need not be a "A" list blogger to get your contents featured. You just need to publish good content, as you do and if your content is good then your article will be featured. Our blog is a very new blog and still it has got featured. This shows the real value of BlogBurst network. We think that, its a great honor to get invited to join BlogBurst, and we are really thankful to blogburst for inviting us.

2) CSS gallery to get traffic:- If you have a good looking blog template or theme, then go ahead and submit your blog to these websites and you can get lot of steady traffic to your site. Our site has been accepted into this and we are getting traffic to our site consistently. And in some of the sites they have voting system and if your blog gets more votes, then your blog will be in the featured category and will get still more traffic.

3) killerstartups:- killerstartups is another place to get traffic from.They have about 11,700 RSS readers and about 513,000 visitors/month (according to Compete.com, which tracks only US based visitors). Killerstartups is ranked among the top 3,300 USA websites, according to Alexa, so it is a great place to introduce your company to the world. But the problem is how to get your site on there. They have an online form where you can fill in all the required details, but then you can only hope for the best. We found Killerstartups from an interesting article at QOT. We did not face any problem to get accepted by them, but it was after getting accepted the real competition started. Killerstartups have a "Top 10" section. After being listed there we start getting lot of traffic and they also make the link to our blog follow from their usual nofollow. And many people start linking to our blog, once our blog reaches and does well(with voting) in the top 10 section. "Vote us, if you think our blog is worth it".

4) 9Rules : And not to forget about 9Rules, even though there are lot of rules to follow to get accepted and to be their member. 9Rules do not accept blogs at any time, they have their schedule to accept the sites and their 7th round has been finished some times ago.

If you find some other websites that can bring lot of traffic, then please tell us in the comment section.
Get 45 days of free hosting from Doreo host

If you are new or want to change your present hosting company, then why not try Doreo host.

Here is a promo code or offer or coupon code or Discount coupon ( “technotip.org” without cotes ) which will give you 45 days of FREE hosting or 12$ off of your purchase of any hosting plans from Doreo.

If you want to know more details –> why we recommend Doreo host.

Your blogger blog template search ends here!

Antonio Lupetti an Engineer, Pro Blogger, Mac user, Musician, Web Addicted from ROME – ITALY has released a wonderful blogger template. Actually he is a master of that template, as he himself use the template on his blog. That means, he has tested it, used it so long that he has almost cleared all the bugs in it.

I had always loved his blog template and hesitated to ask for the source code(to modify, without violating the copy rights). But to my surprise and Antonio Lupetti’s goodness, he has finally released his template source code to the public.

woork-blogspot-template-released-to-public

He has actually released the HTML version rather than XML source code, because HTML is more common than XML and we can easily modify the HTML codes using many software.
Just copy and paste the HTML codes and it will work. Many people think that, they must use only XML in blogger templates, but that’s not true, you can also use valid HTML codes.

The template looks so professional. The template supports easy integration of third-party advertisements (both AdSense or any other ad network and custom 125×125 banners), the best part for people trying to make more money is — you can integrate ads within post(look at the individual post page),Twitter, Job board, Flickr pictures, delicious bookmarks, and you may also embed RSS feeds via the FeedBurner service. And more importantly, I love the comment section of the template. It looks great. But the fact that, blogger platform doesn’t allow for user friendly commenting, we need to migrate to some other page to comment. Hope its done for spam controlling purpose!

And I think this theme works with old Blogspot users also, who haven’t migrated from the Classic HTML template yet, because this is a HTML source code, and theoretically it must work. I haven’t tried it practically, and I am waiting for someone to clear this doubt.

I was very excited to write a post about customizing the template, but Antonio Lupetti himself has done the job and he has explained the customization part of the template from Top to Bottom. Its great article and a must read if you are a blogspot user.
He explains- Adding Blog Logo, Adding tab on the navigation bar, Search field, Customizing Home Page, Your name below each post title, Adding sections on the sidebar, About me section, Recent Post*, Categories on the sidebar, etc. If you have any problem with the template, you can always contact Antonio Lupetti or do a Google Search(if its a general blogger problem).
Happy Blogging 🙂

Add Refinements/Labels to your Custom Search Engine

custom_search_sm

Log into CSE and click on Control panel –> Refinements –> Add refinement.

Refinements are labels that you apply to websites. They appear as a list of links above search results, offering users a way to narrow their search. When a user clicks a refinement label, the sites that you have labeled are given priority in the results. In addition to labeling sites, you can also specify additional words that are added to users’ queries when they click a label, providing even more targeted results.
custom_search_sm
Google maintains a list of existing refinement labels. If you create a label with the same name as one of these, or with the same name as a label in another search engine that you or someone who is collaborating with you has created, users will also have the benefit of seeing relevant sites from these sources in their search results also.

Here refinements acts like the key word help for finding the relevant articles in our blog.