Your blogger blog template search ends here!

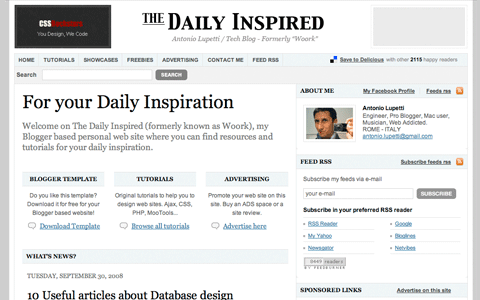
Antonio Lupetti an Engineer, Pro Blogger, Mac user, Musician, Web Addicted from ROME – ITALY has released a wonderful blogger template. Actually he is a master of that template, as he himself use the template on his blog. That means, he has tested it, used it so long that he has almost cleared all the bugs in it.

I had always loved his blog template and hesitated to ask for the source code(to modify, without violating the copy rights). But to my surprise and Antonio Lupetti’s goodness, he has finally released his template source code to the public.

woork-blogspot-template-released-to-public

He has actually released the HTML version rather than XML source code, because HTML is more common than XML and we can easily modify the HTML codes using many software.
Just copy and paste the HTML codes and it will work. Many people think that, they must use only XML in blogger templates, but that’s not true, you can also use valid HTML codes.

The template looks so professional. The template supports easy integration of third-party advertisements (both AdSense or any other ad network and custom 125×125 banners), the best part for people trying to make more money is — you can integrate ads within post(look at the individual post page),Twitter, Job board, Flickr pictures, delicious bookmarks, and you may also embed RSS feeds via the FeedBurner service. And more importantly, I love the comment section of the template. It looks great. But the fact that, blogger platform doesn’t allow for user friendly commenting, we need to migrate to some other page to comment. Hope its done for spam controlling purpose!

And I think this theme works with old Blogspot users also, who haven’t migrated from the Classic HTML template yet, because this is a HTML source code, and theoretically it must work. I haven’t tried it practically, and I am waiting for someone to clear this doubt.

I was very excited to write a post about customizing the template, but Antonio Lupetti himself has done the job and he has explained the customization part of the template from Top to Bottom. Its great article and a must read if you are a blogspot user.
He explains- Adding Blog Logo, Adding tab on the navigation bar, Search field, Customizing Home Page, Your name below each post title, Adding sections on the sidebar, About me section, Recent Post*, Categories on the sidebar, etc. If you have any problem with the template, you can always contact Antonio Lupetti or do a Google Search(if its a general blogger problem).
Happy Blogging 🙂

Tips,Tricks and hack for blogger blogs

Today’s post is dedicated to all those people using blogger.com. Its a great service which offers free web hosting. I wonder how much bandwidth blogger would provide!
Before trying any of the below mentioned tips/tricks, backup your theme — Goto “Layout” -> “Edit HTML” and click on “Download Full Template”..

Today’s post is dedicated to all those people using blogger.com. Its a great service which offers free web hosting. I wonder how much bandwidth blogger would provide!

Before trying any of the below mentioned tips/tricks, backup your theme — Goto “Layout” -> “Edit HTML” and click on “Download Full Template”..
This article is only for education purpose and I am not an expert in coding blogger templates, so try at your own risk. By changing the default behavior of the blogger blogs, you may be violating their policy. So we make it clear that, this article is only for education/learning purpose.

1. To insert Meta tags:-
Place

<meta NAME='description' expr:content='data:blog.pageTitle + &quot;,Put in your common description tags here &quot;'/>

in between <head> </head> tags.

In the above code expr:content= ‘data:blog.pageTitle’ gets replaced by the title of your current page. So when combined with the common description tags, the description tag becomes unique for each page. Also do not forget to replace “Put in your common description tags here” with some description of your website(this will be common for all pages of your website.)

2. Read more option (show only post Excerpt in the home page):-

Login to your account and click on the “Layout” tab. Then select “Edit HTML”. Check ” Expand Widget Templates”.
Now search for </b:skin> and paste the below code between </b:skin> and </head>


<!-- Style to implement "Read more.." link in all the posts (Start) -->
<style>
    <b :if cond='data:blog.pageType == "item"'>
        span.fullpost {display:inline;}
    <b :else/>
        span.fullpost {display:none;}
    </b>
</style>
<!-- Style to implement "Read more.." link in all the posts (End) -->

Now search for <data:post.body/> in the template HTML and paste the following piece of code after <data:post.body/>


<!-- Code to show "Read more.." Link (Begin) -->
          <b :if cond='data:blog.pageType != "item"'>
              <span>
                <a expr:href='data:post.url' 
style='color:#0000FF; 
text-align:right;
font-weight:bold; 
text-decoration:none' >
Read more..
</a>
             </span>
          </b>
          <!-- Code to show "Read more.." Link (End) -->

Save it. That’s all about coding part of the theme. To show only post excerpts on the homepage, you need to insert <span class="fullpost"> post excerpt.Remaining article will be shown after clicking on "Read more.." link.</span> . Now your articles and blog will look more professional.

3. Hide the Blogger navbar:-
Blogger-navbar.jpg
Add this line #navbar-iframe {display: none !important;} before /* Variable definitions

or

Paste below code inbetween <style> </style> , before </head> .


<!--Code to remove blogger navbar-->
#b-navbar {
height:0px;
visibility:hidden;
display:none
}
<!--End of code to remove blogger navbar-->

4. Post articles from email:-
blogger-email-post-publishing.jpg
Goto “Settings”, click on “Email” option. And set the email ID, and start posting articles from your email ID.
Its interesting to note that, you can post upto 10MB of images directly from your email.

5. Bulk image uploader(for firefox users only):-
Use “Drag Drop Uploader” FireFox Addon and upload as many images as you want.

6. Change the default favicon and put your favicon, great for branding purpose:-
Upload your favicon(an image of 16 x 16 pixels or 32 x 32 pixels with .png, .gif, or .ico extension. Use either 8-bit or 24-bit colours.)
Now paste below code between <head> </head> tags.


<link href='Uploaded favicons URL' rel='icon' type='image/gif'/>
<link href='Uploaded favicons URL' rel='shortcut icon' type='image/gif'/>

Book mark this article, as there is more to come, as we investigate and play with Blogger.
We thought of making this a serious post, but it would annoy visitors as they need to navigate to different pages to get what they want. So we decided to keep all things at one place. Hope this article is of some use for some of you. If this article helps you in anyway, then please share this story with as many people as possible.Thanks